目次
こんにちは.高山です.
実践手話認識 - モデル開発編の第六回になります.
手話単語認識モデルでは,各動画フレームから特徴を抽出する方法と動画全体から特徴を抽出する方法を組み合わせて用いることが多いです.
これらの特徴抽出を本記事では,それぞれローカル特徴抽出 (local feature extraction, frame-wise feature extraction とも呼びます) とグローバル特徴抽出 (global feature extraction) と表記します.
今まで紹介してきた,RNN encoder や Transformer encoder,およびそれらの派生手法は,後者のグローバル特徴抽出でしたが,今回からはローカル特徴抽出も少しづつ紹介していきたいと思います.
(今まで触れなかったのは,同時に紹介すると実装と実験が大変だからです(^^;))
今回は特に,時間軸に沿って畳み込み (正確には相互相関ですが) 処理を行う Temporal convolutional neural network (以降,TCNNと表記します) を紹介します.
実は,TCNNは既に Conformerの記事 で Convolution module (第2節をご参照ください) として紹介しています.
今回は Convolution module を少し簡略化した処理ブロックを TCNN として用いて,性能が改善するかを実験してみたいと思います.
なお,今回からは Pydanticを用いた NNモデルの実装 に即して実装を行います.
実装の考え方については,リンク先の記事をご参照ください.
今回解説するスクリプトはGitHub上に公開しています.
複数の実験を行っている都合で,CPUで動かした場合は結構時間がかるのでご注意ください.
1. 実験概要
図1 に今回の実験内容を示します.

手話認識入門第九回で紹介した,Pre-LN 構成の Transformer をベースとして,ローカル特徴抽出ブロックに TCNN を実装して認識性能を評価します.
2. ローカル特徴抽出ブロック
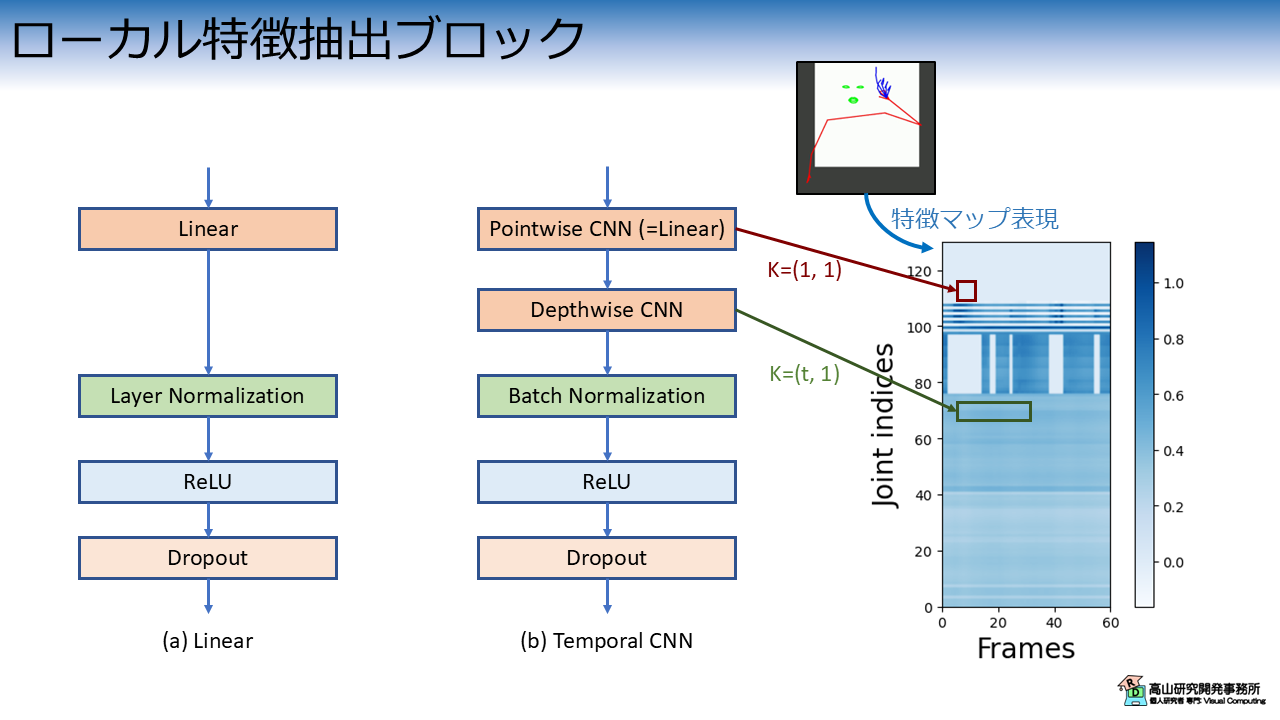
図2 に今回実験を行うローカル特徴抽出ブロックを示します.

図1(a) は Linear層をベースとしたローカル特徴抽出ブロックです.
ベースとなる Transformerで用いたローカル特徴ブロックとほぼ同じですが,Layer Normalization と Dropout を追加しています.
こちらのブロックは,基本的なパラメータ探索と,TCNN との比較に用います.
図2(b) は TCNN層をベースとしたローカル特徴抽出ブロックです.
Conformer の Convolution module から GLU 活性化関数とブロック末尾の Pointwise CNN を削除した構成になっています.
Pointwise CNN は カーネルサイズ \((1, 1)\) の CNN です.
特徴マップの赤四角に示すように,各位置の特徴だけを用いて特徴変換を行います.
この処理は,実質的には Linear 層と同様です.
Depthwise CNN は カーネルサイズ \((t, 1)\) の CNN です.
特徴マップの緑四角に示すように,各追跡点の特徴を時間方向に畳み込んで特徴抽出を行います.
Depthwise CNN は 通常の CNN と異なり,入力の各特徴次元に対して1個ずつカーネルを用意して,時空間フィルタリングだけを行います.
通常の CNN よりも簡略化された処理ですが,Linear層との差,および時間方向の処理に対する効果が分かりやすいと思い,この構成を選びました.
3. 実験結果
実装の詳細に先立って,実験結果をお見せします.
今回の実験では学習を安定させるために,ラベルスムージングと各種のデータ拡張処理を導入しています.
これらの処理については「手話認識入門」の記事で解説しているので,よろしければご一読ください.
- ラベルスムージング
- 追跡点の左右入れ替え
- 時系列クリッピング
- 時系列ワーピング
- アフィン変換
- ノイズ付加
- 追跡点のマスキング
- 時系列リサイジング (Colab上では使ってませんが,実験では使用しています)
学習エポック数は 100,バッチ数は 32,時系列の最大長は256に設定しています.
3.1 Linear層を用いたモデルの認識性能
まず先に,Linear層を用いた認識モデルの実験結果を示します.
こちらのモデルでは基本的なパラメータ探索として,内部特徴量の次元数を変更して性能を比較しました.
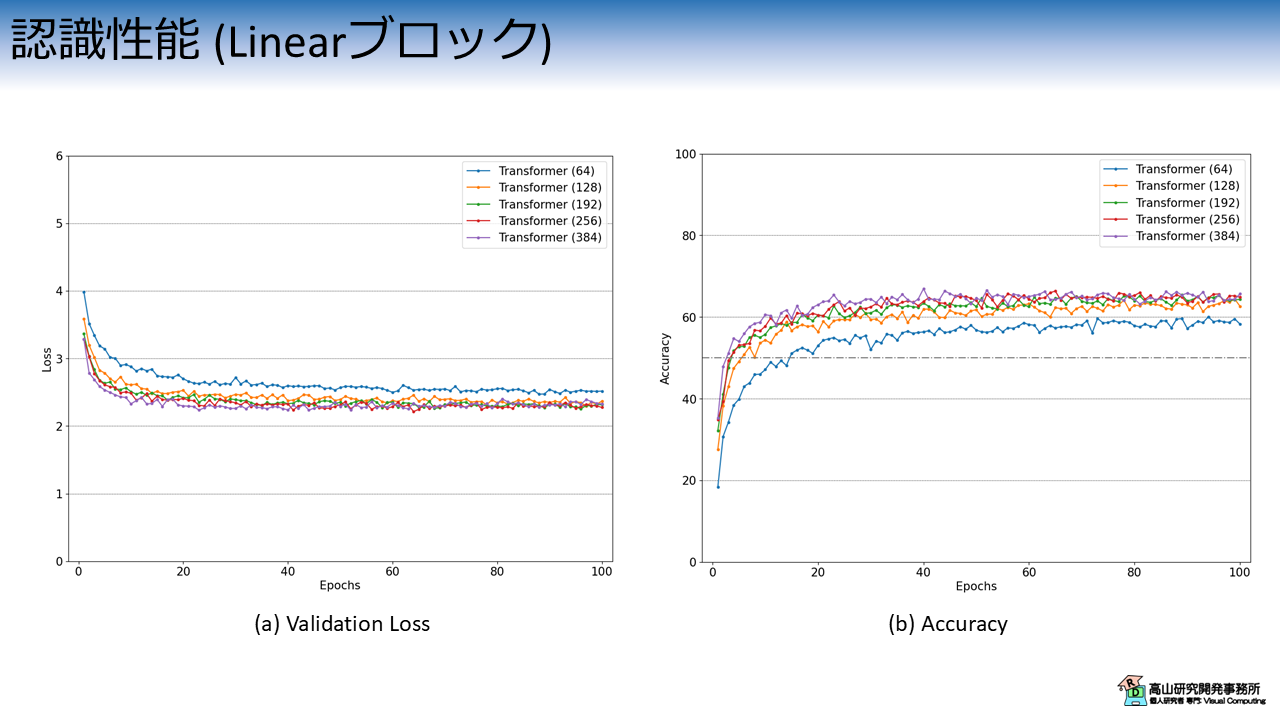
図3は,内部特徴量の次元数毎のValidation Lossと認識率の推移を示しています.

横軸は学習・評価ループの繰り返し数 (Epoch) を示します.
縦軸はそれぞれの評価指標を示します.
各線の色と実験条件の関係は次のとおりです.
- 青線 (Transformer 64): 内部特徴次元数 64 の Transformer
- 橙線 (Transformer 128): 内部特徴次元数 128 の Transformer
- 緑線 (Transformer 192): 内部特徴次元数 192 の Transformer
- 赤線 (Transformer 256): 内部特徴次元数 256 の Transformer
- 紫線 (Transformer 384): 内部特徴次元数 384 の Transformer
これらのモデルでは,Linear層の特徴抽出ブロックで上記の次元数に特徴量を変換して,以降の Transformer でも同じ次元数を保って変換を行います.
ただし,Transformer の Position-wise feed forward では,一時的に倍の次元数の特徴量に変換して戻すという操作を行っています.
実験結果から,青線 (64) と橙線 (128) は明確に性能が劣っていることが分かります.
(つまり,今までの記事で使っていたパラメータはイマイチだったということですね...(^^;))
他の設定に関しては,基本的には次元数が多い方が学習初期の性能は良いですが,最終的には同じレベルに収束しています.
3.2 TCNN層を用いたモデルの認識性能
次に,TCNN層を用いた認識モデルの実験結果を示します.
前項の結果を受けて,TCNN層を用いたモデルでは内部特徴量の次元数を 192 に固定し,Depthwise CNN のカーネルサイズを変更して性能を比較しました.
図4は,カーネルサイズ毎のValidation Lossと認識率の推移を示しています.

各線の色と実験条件の関係は次のとおりです.
- 青線 (Transformer 192): 内部特徴次元数 192 の Transformer
- 橙線 (CNN1D K=5 + Transformer 192): カーネルサイズ 5 の TCNN + Transformer 192
- 緑線 (CNN1D K=9 + Transformer 192): カーネルサイズ 9 の TCNN + Transformer 192
- 赤線 (CNN1D K=13 + Transformer 192): カーネルサイズ 13 の TCNN + Transformer 192
- 紫線 (CNN1D K=17 + Transformer 192): カーネルサイズ 17 の TCNN + Transformer 192
- 茶線 (CNN1D K=21 + Transformer 192): カーネルサイズ 21 の TCNN + Transformer 192
見づらくて恐縮ですが,カーネルサイズが大きいケースでは認識性能が伸びており,紫線 (K=17) が最も良い認識性能でした.
紫線 (K=17) の最大認識率は \(68.7\%\) 程度でしたので,青線 (Transformer 192) の \(65.4\%\) に対して約 \(3.3\%\) 程度性能が向上しています.
なお,今回の実験では話を簡単にするために,実験条件以外のパラメータは固定にし,乱数の制御もしていません.
必ずしも同様の結果になるわけではないので,ご了承ください.
4. 前準備
4.1 データセットのダウンロード
ここからは実装方法の説明をしていきます.
まずは,前準備としてGoogle Colabにデータセットをアップロードします.
ここの工程はこれまでの記事と同じですので,既に行ったことのある方は第4.2項まで飛ばしていただいて構いません.
まず最初に,データセットの格納先からデータをダウンロードし,ご自分のGoogle driveへアップロードしてください.
次のコードでGoogle driveをColabへマウントします.
Google Driveのマウント方法については,補足記事にも記載してあります.
1 2 3 | |
ドライブ内のファイルをColabへコピーします.
パスはアップロード先を設定する必要があります.
# Copy to local.
!cp drive/MyDrive/Datasets/gislr_dataset_top10.zip gislr_top10.zip
データセットはZIP形式になっているので unzip コマンドで解凍します.
!unzip gislr_top10.zip
Archive:  gislr_top10.zip
   creating: dataset_top10/
  inflating: dataset_top10/16069.hdf5
  ...
  inflating: dataset_top10/sign_to_prediction_index_map.json
成功すると dataset_top10 以下にデータが解凍されます.
HDF5ファイルはデータ本体で,手話者毎にファイルが別れています.
JSONファイルは辞書ファイルで,TXTファイルは本データセットのライセンスです.
!ls dataset_top10
16069.hdf5  25571.hdf5  29302.hdf5  36257.hdf5  49445.hdf5  62590.hdf5
18796.hdf5  26734.hdf5  30680.hdf5  37055.hdf5  53618.hdf5  LICENSE.txt
2044.hdf5   27610.hdf5  32319.hdf5  37779.hdf5  55372.hdf5  sign_to_prediction_index_map.json
22343.hdf5  28656.hdf5  34503.hdf5  4718.hdf5   61333.hdf5
単語辞書には単語名と数値の関係が10単語分定義されています.
!cat dataset_top10/sign_to_prediction_index_map.json
{
    "listen": 0,
    "look": 1,
    "shhh": 2,
    "donkey": 3,
    "mouse": 4,
    "duck": 5,
    "uncle": 6,
    "hear": 7,
    "pretend": 8,
    "cow": 9
}
ライセンスはオリジナルと同様に,CC-BY 4.0 としています.
!cat dataset_top10/LICENSE.txt
The dataset provided by Natsuki Takayama (Takayama Research and Development Office) is licensed under CC-BY 4.0.
Author: Copyright 2024 Natsuki Takayama
Title: GISLR Top 10 dataset
Original licenser: Deaf Professional Arts Network and the Georgia Institute of Technology
Modification
- Extract 10 most frequent words.
- Packaged into HDF5 format.
次のコードでサンプルを確認します.
サンプルは辞書型のようにキーバリュー形式で保存されており,下記のように階層化されています.
- サンプルID (トップ階層のKey)
  |- feature: 入力特徴量で `[C(=3), T, J(=543)]` 形状.C,T,Jは,それぞれ特徴次元,フレーム数,追跡点数です.
  |- token: 単語ラベル値で `[1]` 形状.0から9の数値です.
1 2 3 4 5 6 7 8 9 | |
['1109479272', '11121526', ..., '976754415']
<KeysViewHDF5 ['feature', 'token']>
(3, 23, 543)
[1]
4.2 モジュールのダウンロード
次に,過去の記事で実装したコードをダウンロードします.
コードはGithubのsrc/modules_gislrにアップしてあります (今後の記事で使用するコードも含まれています).
まず,下記のコマンドでレポジトリをダウンロードします.
今後のアップデートを考慮してバージョン指定をしていますので注意してください.
!wget https://github.com/takayama-rado/trado_samples/archive/refs/tags/v0.4.1.zip -O master.zip
--2024-10-23 04:27:31--  https://github.com/takayama-rado/trado_samples/archive/refs/tags/v0.4.1.zip
...
2024-10-23 04:27:36 (18.9 MB/s) - ‘master.zip’ saved [80365125]
ダウンロードしたリポジトリを解凍します.
!unzip -o master.zip -d master
Archive:  master.zip
ab8d10d4e0745f02a625f681f21bd5f5d0038f10
   creating: master/trado_samples-0.4.1/
  inflating: master/trado_samples-0.4.1/.gitignore
  ...
モジュールのディレクトリをカレントディレクトリに移動します.
!mv master/trado_samples-0.4.1/src/modules_gislr .
他のファイルは不要なので削除します.
!rm -rf master master.zip gislr_top10.zip
!ls
dataset_top10 drive modules_gislr  sample_data
4.3 モジュールのロード
主要な処理の実装に先立って,下記のコードでモジュールをロードします.
1 2 3 4 5 6 7 8 9 10 11 12 13 14 15 16 17 18 19 20 21 22 23 24 25 26 27 28 29 30 31 32 33 34 35 36 37 38 39 40 41 42 43 44 45 46 47 48 49 50 51 52 53 54 55 56 57 58 59 60 61 62 63 | |
【コード解説】
- 標準モジュール
  - collections: 特殊なコンテナデータを作成するためにライブラリ.TCNN層をインスタンス化する際に使用します.
  - copy: データコピーライブラリ.Transformerブロック内でEncoder層をコピーするために使用します.
  - json: JSONファイル制御ライブラリ.辞書ファイルのロードに使用します.
  - math: 数学演算ライブラリ.
  - os: システム処理ライブラリ
  - sys: Pythonインタプリタの制御ライブラリ.
    今回はローカルモジュールに対してパスを通すために使用します.
  - functools: 関数オブジェクトを操作するためのライブラリ.
    今回はDataLoaderクラスに渡すパディング関数に対して設定値をセットするために使用します.
  - pathlib.Path: オブジェクト指向のファイルシステム機能.
    主にファイルアクセスに使います.osモジュールを使っても同様の処理は可能です.
    高山の好みでこちらのモジュールを使っています(^^;).
- 3rdパーティモジュール
  - numpy: 行列演算ライブラリ
  - pydantic: データ検証ライブラリ.NNモデルのパラメータをラップするために用います.
  - torch: ニューラルネットワークライブラリ
  - torchvision: PyTorchと親和性が高い画像処理ライブラリ.
    今回はDatasetクラスに与える前処理をパッケージするために用います.
- ローカルモジュール: sys.pathにパスを追加することでロード可能
  - dataset: データセット操作用モジュール
  - defines: 各部位の追跡点,追跡点間の接続関係,およびそれらへのアクセス処理を
    定義したモジュール
  - layers: ニューラルネットワークのモデルやレイヤモジュール
  - transforms: 入出力変換処理モジュール
  - train_functions: 学習・評価処理モジュール
  - utils: 汎用処理関数モジュール
5. ローカル特徴抽出ブロックの実装
ここから先は,ローカル特徴抽出ブロックを実装していきます.
今回は,Pydanticを用いた NNモデルの実装 で紹介したように,各レイヤのパラメータを Pydantic モデルでラップして実装をしていきます.
まず最初に,下記のコードで Pydantic モデルの設定を行います.
1 2 | |
上記の設定は,クラスで未定義の変数が入力された場合にエラーとする設定です.
(デフォルトでは無視する設定になっています)
ConfiguredModel を継承したクラスにパラメータを実装することで,Pydantic の検証機能を備えたパラメータクラスが実装できます.
5.1 Linear feature extraction block
では,Linear層を用いたローカル特徴抽出ブロックを実装していきます.
次のコードで設定パラメータを実装します.
1 2 3 4 5 6 7 8 9 10 11 12 13 14 15 | |
【コード解説】
- 引数
  - fext_type: ローカル特徴抽出ブロックの識別名です.
    パラメータを保存した際の確認や,アプリケーション側で利用することを
    想定しています.
    レイヤ内では使用していません.
  - in_channels: 入力特徴量の次元数
  - out_channels: 出力特徴量の次元数
  - norm_type: 正規化層の種別を指定 [batch/layer]
  - norm_eps: LN層内で0除算を避けるための定数
  - activation: 活性化関数の種別を指定 [relu/gelu/swish/silu/mish/geluacc/tanhexp]
  - add_bias: Trueの場合,線形変換層にバイアス項を導入する
  - dropout: Dropout層の欠落率
  - channel_first: True の場合,入力特徴量が `[N, C, *...]` 形状と想定して処理を
    行う.
    False の場合,入力特徴量が `[N, *..., C]` 形状と想定して処理を行う.
  - add_residual: True の場合,Residual connection を挿入する.
    ただし,`in_channels != out_channels` の場合は処理を行わない.
norm_type や activation は入力値を実装済みのレイヤ名に制限したいので,Field を使って型を定義しています.
pattern に入力可能な文字列を正規表現で与えることで,値を制限できます.
パラメータクラスを用いると,レイヤクラスは下記のように実装できます.
1 2 3 4 5 6 7 8 9 10 11 12 13 14 15 16 17 18 19 20 21 22 23 24 25 26 27 28 29 30 31 32 33 34 35 36 37 38 39 40 41 42 43 44 45 46 47 48 49 50 51 52 53 | |
【コード解説】
- 4-25行目: 初期化処理
  - 22-25行目: `add_residual is True` の場合,Residual connection を追加します.
    ただし,`in_channels != out_channels` の場合は 0 を返して分岐を無効化しています.
- 27-53行目: 推論処理
  - 30-43行目: 多様な形状の入力に備えて,形状変更処理を適用.
  - 44-49行目: 各レイヤを順次呼び出して特徴変換.
  - 50-52行目: `channel_first` の値に併せて,出力形状を調整.
今までの実装では必要な引数がズラッと並んでいたところですが,パラメータクラスを介することでスッキリと書くことができるようになりました.
5.2 Temporal CNN feature extraction block
次に,TCNN層を用いたローカル特徴抽出ブロックを実装していきます.
次のコードで設定パラメータを実装します.
1 2 3 4 5 6 7 8 9 10 11 12 13 14 15 16 17 18 19 20 21 22 23 24 | |
【コード解説】
- 引数
  - fext_type: ローカル特徴抽出ブロックの識別名です.
    パラメータを保存した際の確認や,アプリケーション側で利用することを
    想定しています.
    レイヤ内では使用していません.
  - in_channels: 入力特徴量の次元数
  - out_channels: 出力特徴量の次元数
  - kernel_size: Depthwise CNN の時間方向カーネルサイズ
  - stride: Depthwise CNN の処理間隔を指定.
    例えば,stride=2 の場合は,1個飛ばしで処理を行うので出力特徴の系列長は
    半分になります.
  - padding_mode: Depthwise CNN のパディング処理種別を指定.
  - norm_type: 正規化層の種別を指定 [batch/layer]
  - norm_eps: LN層内で0除算を避けるための定数
  - activation: 活性化関数の種別を指定 [relu/gelu/swish/silu/mish/geluacc/tanhexp]
  - causal: True の場合,Causal convolution を適用します.
    この手法では未来の情報を含まないように畳み込みを行います.
    リアルタイム処理など,現在のフレームよりも過去の情報しか得られない場合の
    利用を想定しています.
  - add_residual: True の場合,Residual connection を挿入.
    ただし,`in_channels != out_channels` の場合は Pointwise CNN 分岐特徴量の
    次元数を揃えます.
  - add_bias: Trueの場合,線形変換層にバイアス項を導入する
  - dropout: Dropout層の欠落率
パラメータクラスを用いると,レイヤクラスは下記のように実装できます.
1 2 3 4 5 6 7 8 9 10 11 12 13 14 15 16 17 18 19 20 21 22 23 24 25 26 27 28 29 30 31 32 33 34 35 36 37 38 39 40 41 42 43 44 45 46 47 48 49 50 51 52 53 54 55 56 57 58 59 60 61 62 63 64 65 66 67 68 69 70 71 72 73 74 75 76 77 78 79 80 81 82 | |
【コード解説】
- 4-35行目: 初期化処理
  - 9-12行目: Causal convolution の場合は畳み込み範囲が過去フレーム側にずれる
    ので,パディング長を調整する必要があります.
  - 19-35行目: `add_residual is True` の場合,Residual connection を追加します.
    ただし,`in_channels == out_channels and stride > 1` の場合は,
    系列長を揃えるために,プーリングを行っています.
    また,`in_channels != out_channels` の場合は Pointwise CNN を用いて
    出力次元数を揃えています.
- 38-62行目: TCNNブロック作成処理.
  今後のTCNN拡張に備えて,`nn.Sequential` でラップして実装するようにしています.
- 64-82行目: 推論処理
  - 67-74行目: 多様な形状の入力に備えて,形状変更処理を適用.
  - 76-81行目: 各レイヤを順次呼び出して特徴変換.
今回は1個のローカル特徴抽出ブロックを用いますが,通常は複数のブロックをカスケード接続した構成が用いられます.
そのため,次の関数でブロック郡を nn.ModuleList でラップするようにしています.
この処理は親クラス (モデルなど) から呼び出されることを想定しています.
今回の場合は,TransformerEnISLR が呼び出してローカル特徴抽出ブロックを作成します.
1 2 3 4 5 6 7 8 | |
6. 認識モデルの実装
Colabのコードではこの後,Pydantic を用いて Transformer ベースの認識モデルをリファクタリングしています.
本記事の主要点では無いので,Transformer のリファクタリングについては補足記事で説明しています.
併せてご一読いただけたら幸いです.
7. モデルの動作確認
認識モデルの実装ができましたので,動作確認をしていきます.
次のコードでデータセットからHDF5ファイルとJSONファイルのパスを読み込みます.
1 2 3 4 5 6 7 8 | |
dataset_top10/sign_to_prediction_index_map.json
[PosixPath('dataset_top10/22343.hdf5'), ..., PosixPath('dataset_top10/37055.hdf5')
次のコードで辞書ファイルをロードして,認識対象の単語数を格納します.
1 2 3 4 5 | |
次のコードで前処理を定義します.
今回は「手話認識入門」で紹介した,各種のデータ拡張を実装します.
1 2 3 4 5 6 7 8 9 10 11 12 13 14 15 16 17 18 19 20 21 22 23 24 25 26 27 28 29 30 31 32 33 34 35 36 37 38 39 40 41 42 43 44 45 46 47 48 49 50 51 52 53 54 55 56 57 58 59 60 61 | |
次のコードで,前処理を適用したHDF5DatasetとDataLoaderをインスタンス化し,データを取り出します.
1 2 3 4 5 6 7 8 9 10 11 12 13 14 15 16 17 18 19 | |
torch.Size([2, 2, 66, 130])
次のコードで Linear層をローカル特徴抽出ブロックに用いたモデルをインスタンス化して,動作チェックをします.
1 2 3 4 5 6 7 8 9 10 11 12 13 14 15 16 17 18 19 20 21 22 23 24 25 26 27 28 29 30 31 32 33 34 35 36 37 38 39 40 41 42 | |
11-22行目に示すとおり,ローカル特徴抽出ブロックは辞書形式からパラメータクラスへと変換して実装しています.
今回はコード上で直接設定していますが,JSON形式のファイルにパラメータを保存しておいて,読み込んで実行などもできます.
26-35行目に示すとおり,認識モデルのパラメータはまずデフォルト値でクラスを作成して,いくつかのパラメータを書き換えています.
特定の値だけ変更して残りは固定したい場合などは,このような実装方法も可能です.
print() 結果から,想定通りにモデルが作成できていることが分かります.
TransformerEnISLR(
  (fext_module): ModuleList(
    (0): LinearFeatureExtractor(
      (linear): Linear(in_features=260, out_features=64, bias=True)
      (norm): LayerNorm((64,), eps=1e-05, elementwise_affine=True)
      (activation): ReLU()
      (dropout): Dropout(p=0.1, inplace=False)
      (residual): Zero()
    )
  )
  (tr_encoder): TransformerEncoder(
    (pos_encoder): PositionalEncoding(
      (dropout): Dropout(p=0.1, inplace=False)
    )
    (layers): ModuleList(
      (0-1): 2 x PreNormTransformerEncoderLayer(
        (norm_sattn): LayerNorm((64,), eps=1e-05, elementwise_affine=True)
        (self_attn): MultiheadAttention(
          (w_key): Linear(in_features=64, out_features=64, bias=True)
          (w_value): Linear(in_features=64, out_features=64, bias=True)
          (w_query): Linear(in_features=64, out_features=64, bias=True)
          (w_out): Linear(in_features=64, out_features=64, bias=True)
          (dropout_attn): Dropout(p=0.1, inplace=False)
        )
        (norm_pffn): LayerNorm((64,), eps=1e-05, elementwise_affine=True)
        (pffn): PositionwiseFeedForward(
          (w_1): Linear(in_features=64, out_features=128, bias=True)
          (w_2): Linear(in_features=128, out_features=64, bias=True)
          (dropout): Dropout(p=0.1, inplace=False)
          (activation): ReLU()
        )
        (dropout): Dropout(p=0.1, inplace=False)
      )
    )
    (norm_tail): LayerNorm((64,), eps=1e-05, elementwise_affine=True)
  )
  (head): GPoolRecognitionHead(
    (head): Linear(in_features=64, out_features=10, bias=True)
  )
)
torch.Size([2, 10])
同様に,次のコードで TCNN層をローカル特徴抽出ブロックに用いたモデルをインスタンス化して,動作チェックをします.
ローカル特徴抽出ブロックとモデルの設定は独立しているため,islr_settings はそのまま使い回すことができます.
1 2 3 4 5 6 7 8 9 10 11 12 13 14 15 16 17 18 19 20 21 22 | |
TransformerEnISLR(
  (fext_module): ModuleList(
    (0): CNN1DFeatureExtractor(
      (conv_module): Sequential(
        (pconv): Conv1d(260, 64, kernel_size=(1,), stride=(1,))
        (dconv): Conv1d(64, 64, kernel_size=(3,), stride=(1,), padding=(1,), groups=64)
      )
      (norm): BatchNorm1d(64, eps=1e-05, momentum=0.1, affine=True, track_running_stats=True)
      (activation): ReLU()
      (dropout): Dropout(p=0.1, inplace=False)
      (residual): Zero()
    )
  )
  (tr_encoder): TransformerEncoder(
    (pos_encoder): PositionalEncoding(
      (dropout): Dropout(p=0.1, inplace=False)
    )
    (layers): ModuleList(
      (0-1): 2 x PreNormTransformerEncoderLayer(
        (norm_sattn): LayerNorm((64,), eps=1e-05, elementwise_affine=True)
        (self_attn): MultiheadAttention(
          (w_key): Linear(in_features=64, out_features=64, bias=True)
          (w_value): Linear(in_features=64, out_features=64, bias=True)
          (w_query): Linear(in_features=64, out_features=64, bias=True)
          (w_out): Linear(in_features=64, out_features=64, bias=True)
          (dropout_attn): Dropout(p=0.1, inplace=False)
        )
        (norm_pffn): LayerNorm((64,), eps=1e-05, elementwise_affine=True)
        (pffn): PositionwiseFeedForward(
          (w_1): Linear(in_features=64, out_features=128, bias=True)
          (w_2): Linear(in_features=128, out_features=64, bias=True)
          (dropout): Dropout(p=0.1, inplace=False)
          (activation): ReLU()
        )
        (dropout): Dropout(p=0.1, inplace=False)
      )
    )
    (norm_tail): LayerNorm((64,), eps=1e-05, elementwise_affine=True)
  )
  (head): GPoolRecognitionHead(
    (head): Linear(in_features=64, out_features=10, bias=True)
  )
)
torch.Size([2, 10])
8. 学習と評価
8.1 共通設定
では,実際に学習・評価を行います.
まずは,実験全体で共通して用いる設定値を次のコードで実装します.
1 2 3 4 5 6 7 8 9 10 11 12 13 14 15 16 17 18 19 20 | |
Using 2 cores for data loading.
Using cpu for computation.
次のコードで学習・バリデーション・評価処理それぞれのためのDataLoaderクラスを作成します.
1 2 3 4 5 6 7 8 9 10 11 | |
8.2 学習・評価の実行
次のコードでモデルをインスタンス化します.
4行目に示すように,今回はラベルスムージングを有効にしています.
1 2 3 4 5 | |
TransformerEnISLR(
  (fext_module): ModuleList(
    (0): LinearFeatureExtractor(
      (linear): Linear(in_features=260, out_features=64, bias=True)
      (norm): LayerNorm((64,), eps=1e-05, elementwise_affine=True)
      (activation): ReLU()
      (dropout): Dropout(p=0.1, inplace=False)
      (residual): Zero()
    )
  )
  (tr_encoder): TransformerEncoder(
    (pos_encoder): PositionalEncoding(
      (dropout): Dropout(p=0.1, inplace=False)
    )
    (layers): ModuleList(
      (0-1): 2 x PreNormTransformerEncoderLayer(
        (norm_sattn): LayerNorm((64,), eps=1e-05, elementwise_affine=True)
        (self_attn): MultiheadAttention(
          (w_key): Linear(in_features=64, out_features=64, bias=True)
          (w_value): Linear(in_features=64, out_features=64, bias=True)
          (w_query): Linear(in_features=64, out_features=64, bias=True)
          (w_out): Linear(in_features=64, out_features=64, bias=True)
          (dropout_attn): Dropout(p=0.1, inplace=False)
        )
        (norm_pffn): LayerNorm((64,), eps=1e-05, elementwise_affine=True)
        (pffn): PositionwiseFeedForward(
          (w_1): Linear(in_features=64, out_features=128, bias=True)
          (w_2): Linear(in_features=128, out_features=64, bias=True)
          (dropout): Dropout(p=0.1, inplace=False)
          (activation): ReLU()
        )
        (dropout): Dropout(p=0.1, inplace=False)
      )
    )
    (norm_tail): LayerNorm((64,), eps=1e-05, elementwise_affine=True)
  )
  (head): GPoolRecognitionHead(
    (head): Linear(in_features=64, out_features=10, bias=True)
  )
)
次のコードで学習・評価処理を行います.
1 2 3 4 5 6 7 8 9 10 11 12 13 14 15 16 17 18 19 20 21 22 23 24 | |
Start training.
--------------------------------------------------------------------------------
Epoch 1
Start training.
loss:4.062360 [    0/ 3881]
loss:1.856617 [ 3200/ 3881]
Done. Time:10.713473944999976
Training performance:
 Avg loss:2.202826

Start validation.
Done. Time:0.35118736500001546
Validation performance:
 Avg loss:1.894282

Start evaluation.
Done. Time:1.291084839000007
Test performance:
 Accuracy:44.5%
--------------------------------------------------------------------------------
...
--------------------------------------------------------------------------------
Epoch 50
Start training.
loss:0.997563 [    0/ 3881]
loss:0.832069 [ 3200/ 3881]
Done. Time:8.466729444000066
Training performance:
 Avg loss:0.879011

Start validation.
Done. Time:0.6205663220000588
Validation performance:
 Avg loss:0.773825

Start evaluation.
Done. Time:1.381203117000041
Test performance:
 Accuracy:89.0%
Minimum validation loss:0.7608617459024701 at 41 epoch.
Maximum accuracy:91.0 at 41 epoch.
以後,同様の処理を TCNN ブロックを用いたモデルでも行います.
コード構成は同じですので,ここでは説明を割愛させていただきます.
また,この後グラフ等の描画も行っておりますが,本記事の主要点ではないため説明を割愛させていただきます.
今回は,Temporal CNN を用いたローカル特徴抽出ブロックを導入し,孤立手話単語認識モデルの性能改善を試みましたが,如何でしたでしょうか?
パラメータチューニングに苦戦してかなり時間がかかってしまいました(^^;)
特徴抽出は山のように手法が提案されており,どれが良いかを探すのも一苦労です.
また,良さそうに見える手法もパラメータ次第で全く効果が発揮できないこともあります.
私自身正解を知っているわけではありませんが,本記事を通じて同じような苦労をしている方に何か参考になれば幸いです.


